Here’s a basic setup for uploading images using Pyscript, as well as manipulating them using Pillow, including code and commentary: Uploading and Manipulating Images in Pyscript
I got thoroughly nerd-sniped by this question from a member of the unofficial Pyscript discord about how to upload, manipulate, and display images. There’s a few weird corners in terms of getting the bytes from the browser into Pillow and back, but ultimately, it’s fairly straightforward.
Also, there’s an odd issue where the images will display fine, but using “Save Image As…” downloads the file as a .txt, and the browser thinks the MIME type of the image is “plain/text”… not sure why the image type isn’t sticking.
3 Likes
Very good article. I learned a couple of tips. I noticed that you are using multiple <py-script> tags. I never thought of trying that.
Your article 7-GUIs-PyScript is very slick. Your should promote those examples as they are great getting started projects.
As a side question: what are you using to display the inline code in black? I would like to use that style for my articles.
1 Like
Thanks John - at this point I believe there’s no functional difference between multiple Pyscript tags and a single long one, other than the ability to src from individual python files and maintain a little code organization. Though the groundwork’s been laid to have multiple runtimes present on a single page, and I’m currently (slowly) working on a PR to allow different scripts to execute in different namespaces, which hopefully will be useful.
The site is built using Hugo (a static-site generator) which uses Chroma for syntax highlighting, though I’m sure you could use it from the command line or build it into a build process. I personally use the monokai theme.
Edit: Sorry, I missed where you asked specifically about the inline styles the first time through. That’s just some css styling on code tags, specifically:
code {
    font-family: ui-monospace, SFMono-Regular, Menlo, Monaco, Consolas, "Liberation Mono", "Courier New", monospace;
    font-size: 0.875rem;
    line-height: 1.25rem;
    display: inline;
    padding-left: 0.5rem;
    padding-right: 0.5rem;
    background-color: rgba(209, 213, 219, 1);
    /* tailwind equivalent: px-2 font-mono text-sm bg-gray-300; */
}
1 Like
Hi @JeffGlass !
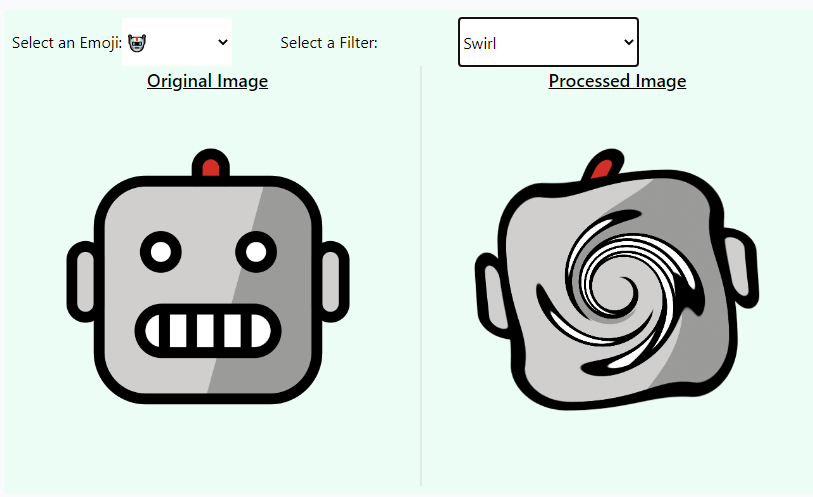
Thanks for this great example, I think this can be very powerful to showcase image processing algorithms. One idea for such a project would be: Choose an emoji, choose an algorithm from scikit-image, and then see the magic happen.
This is the normal python script:
from PIL import Image
import matplotlib.pyplot as plt
import requests

emoji = "🐶"
emoji_code = "-".join(f"{ord(c):x}" for c in emoji).upper()
url = f"https://raw.githubusercontent.com/hfg-gmuend/openmoji/master/color/618x618/{emoji_code}.png"
print(url)

im = Image.open(requests.get(url, stream=True).raw)
plt.imshow(im)
As expected, the import requests fails in pyscript.
In case that you are interested in this problem, would you be interested to make a minimal example that fetches an image from another URL using pyscript?
1 Like
That’s a neat idea for sure! Below is code for a (fairly) minimal example of how to fetch the emoji from that github content, turn it into a numpy array (so scikit can process it), do some processing (I chose transform.swirl), and turn it back into an image to be printed to the screen.
I put up a demo of the code (with a few more emojis and filters) up on my site, along with source, if you’d like to play with it: https://jeff.glass/post/scikit-image-processing/
One thing I learned: there’s a bit of weirdness in passing the data back and forth from Pillow (which handles the image format processing and palette conversion) and scikit-image - sometimes the RGB(A) values are represented as floats in the range 0-1, sometimes as bytes in 0-255, and sometimes as floats in the range 0-255! The conversion step back from the sci-kit processing style back to pillow attempts to address these possibilities, and turn the data back into the bytes (0-255 values) that Pillow wants to see, but I don’t guarentee that’s flawless.
from PIL import Image

from js import document, console, Uint8Array, window, File
from pyodide.http import pyfetch
import asyncio
import io
import numpy as np
from numpy import asarray

# Get an emoji image and fetch it:
emoji = "🚀"
emoji_code = "-".join(f"{ord(c):x}" for c in emoji).upper()
url = f"https://raw.githubusercontent.com/hfg-gmuend/openmoji/master/color/618x618/{emoji_code}.png"

async def get_emoji_bytes(url: str):
    response = await pyfetch(url)
    if response.status == 200:
        return await response.bytes()

#BytesIO wants a bytes-like object, so convert to bytearray first
bytes_list = bytearray(await get_emoji_bytes(url))
my_bytes = io.BytesIO(bytes_list)

#Create PIL image from BytesIO
my_original_image = Image.open(my_bytes)
my_image = Image.open(my_bytes)

#Convert to an np-array to allow for processing
my_array = np.array(my_image.convert()) # convert() is key, as these images use a pallete!!

# -------- Do image processing here ------

from skimage.transform import swirl
my_array = swirl(my_array, rotation = 0, strength = 15, radius = 300)

# -------- End image processing -----------

#convert back to Pillow image:
if my_array[row:= 0][column:= 0][red:= 0] < .99:
    # Many transforms represent RGB as floats in the range 0-1, which pillow does not like
    # This converts their values back to 0-255
    my_image = Image.fromarray((my_array*255).astype(np.uint8))
else:
    my_image = Image.fromarray(data.astype(np.uint8))

#Export image from Pillow as bytes to get to Javascript
my_processed_stream = io.BytesIO()
my_image.save(my_processed_stream, format="PNG")

#Create a JS File object with our data and the proper mime type
processed_image_file = File.new([Uint8Array.new(my_processed_stream.getvalue())], "new_image_file.png", {type: "image/png"})
original_image_file = File.new([Uint8Array.new(my_bytes.getvalue())], "new_image_file.png", {type: "image/png"})

#Create new tags and insert into page
new_image = document.createElement('img')
new_image.src = window.URL.createObjectURL(processed_image_file)
document.getElementById("new_image").appendChild(new_image)

original_image = document.createElement('img')
original_image.classList.add("w-auto")
original_image.src = window.URL.createObjectURL(original_image_file)
document.getElementById("original_image").appendChild(original_image)

x=1 #Prevents an apparent error of Pyscript trying to write its final value to the DOM
5 Likes